Friday, January 13, 2012

How to access blocked web sites from school, office, or work using JAP


Looking for a way to access blocked websites like Orkut, YouTube, MySpace, FaceBook, etc from school or work? Most people end up trying out the million or so proxy servers out there, but those are usually dead ends. Also, those proxy servers are very slow and it can take a year for a single web page to load sometimes! There’s luckily an easier way to access blocked websites that doesn’t rely on proxy servers!
JAP is a free open-source software tool that can be used to browse the web anonymously and unobservably. Whenever you browse the Internet, your IP uniquely identifies your computer and your location to the requesting servers, thereby reducing your privacy. JAP uses a single static IP address for many JAP users, thereby making it impossible for the visited website or any sniffer to determine which user visited.
JAP
The extra benefit that we can also get out of using JAP other than anonymous browsing is the fact that it can be used to access blocked web sites! That’s because all requests are first passed to JAP servers, then the requested sites are retrieved from their servers. Basically, for the local servers that control your access, it looks as if you’re always requesting something from the JAP web site, not FaceBook or MySpace, etc.
Here’s how to setup JAP: first download the JAP app from the link above. Install it and make sure it’s up and running. Then all you have to do is change some of the settings in Internet Explorer or Firefox. You have to change the LAN Settings so that the Default Gateway is 127.0.0.1 and the port is 4001.
In IE, click on Tools, then Internet Options, and click on the Connections tab.
lan settngs
If you’re connecting to the Internet using a dial-up, modem, or ISDN connection, choose your connection and then click on the Settings button at the top. If you’re connected permanently using a LAN, Cable or DSL connection, click on the Settings button under Local Area Network (LAN) settings heading.
browse anonymously
Check the Proxy Server box and type in the IP address and port number shown above.
For Firefox, you click on Tools, then Options, and then click on the Advanced tab. Under Connection, click on Settings.
jap ports
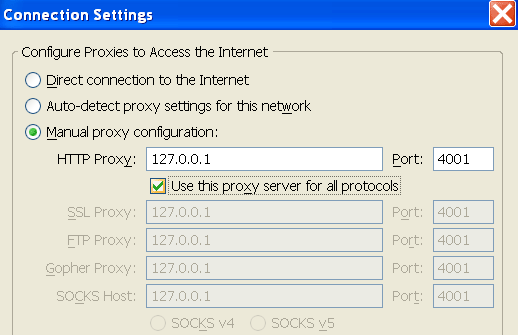
Click on Manual Proxy Configuration and enter in the same information. Check the box to use this proxy for all protocols. You can also download a cool plugin in Firefox called SwitchProxy that will allow you to quickly switch between JAP and normal browsing.
You should now be able to access blocked web sites while JAP is running. However, if you are at the office or at school and the only ports that are open are port 80, and 443, then JAP won’t work without a little more tweaking.
  • In JAP under “Config/InfoService“, change the port from 6543 to 80
  • Go to the “Config/Anonymity” page. Click on the “Fetch” button and choose the “Dresden-Dresden” cascade from the drop down menu.
  • Select the “Manual Configuration” radio button and change the Anon-Port from 6544 to 443
Now try to activate the anonymous web access. If you’re able to connect, you’ll now be able to browse web sites using the normal web access ports so even if your company or school blocks all other ports, you’ll still be able to access JAP.
Also, if your company forces you to access the web through a proxy server, then you’ll need to configure that in JAP. You can see if you have to go through a proxy server by checking out the values in the above LAN settings section. If it’s greyed out with something already in there when you tried to change it to 127.0.0.1, that means you’re going through a proxy server.
In that case, in JAP you need to do the following:
  • Activate the checkbox under “Config/Proxy-Firewall” and enter the address of the required proxy. Some proxies require a user authorization. If this is the case, activate the appropriate checkbox and enter the User ID. (First try it without authorization and only do this step if it doesn’t work.)
  • Under “Config/InfoService“, change the port number from 6543 to “80″.
  • Go to the “Config/Anonymity” page. Click on the “Fetch” button and choose the “Dresden-Dresden” cascade from the drop down menu.
You should now be able to connect to the JAP service and access any web site that you like! If that was too technical or something was not explained clearly, please post a comment and I will try to help as much as possible! Enjoy!

How to fix USB device not recognized in Windows

Are you getting a “USB device not recognized” error whenever you plug in a USB mouse, keyboard, or other USB device? I love USB and have 5 ports on my computer so that I can connect my mouse, keyboard, camera, phone, and printer to it all at once!
However, last weekend, my computer stopped recognizing my USB devices! The strange thing about it was that the USB ports were not bad because all of my devices were still getting power to them. I could still charge my cell phone without a problem!
usb device not recognized
So I started with the normal fixing methods, including uninstalling the drivers for my devices and reinstalling them. That didn’t work! Next I tried System Restore thinking that maybe I had installed something and it caused a conflict with the USB system drivers. That didn’t work!
I read online that in order to fix this problem I should go to Device Manager and uninstall all of the devices under USB Controllers. Restarted the computer, reinstalled the USB drivers, but the problem STILL did not go away!
You may also see in Device Manager that the device shows up as an “Unknown Device”.
unknown usb device
So how did I finally fix the problem? Well, apparently it’s a super simple solution! No need to edit the registry, uninstall drivers, or anything of that sort.
Simply UNPLUG YOUR COMPUTER FROM THE POWER SUPPLY. Yes that’s it! Note that this does not mean just turning off your computer because modern computers don’t really turn off when you press the power button as the motherboard still gets power.
First to explain, the motherboard is where all of hardware of the computer is connected to, including the USB ports. Sometimes the motherboard needs to be “rebooted” also because something can go wrong, i.e. all your USB ports suddenly stop working. The small microprocessor on the motherboard will reload the drivers and your USB ports should be back to recognizing all devices!
So first turn off your computer using Shut Down or pressing the power button and then UNPLUG it from the wall outlet. Let it sit for about a minute and then plug it back in.
Hope this helps someone fix that pesky “USB device not recognized” Windows error!

Google Chrome Shortcuts – 70 Useful Shortcuts to Boost Performance


google-chrome-shortcuts Google Chrome shortcuts provide an easy and effective way to improve productivity and Internet browsing  performance when using Google’s web browser. From Page Navigation to managing Pages and Tabs to speeding up Web Page and Address bar tasks this posts will cover 70 Chrome shortcuts for  boosting your efficiency using the Chrome web browser.
Many people feel that Chrome performs much faster than Internet Explorer and Firefox and find it to be a very stable web browser. Utilizing these built in keyboard shortcuts can make Chrome’s Internet browsing performance seem even faster.
A number of the Chrome shortcuts will be a combination of keystrokes. “Ctrl + C” means that you should hold down the Ctrl (control) key and press the letter “c” for example. Use the lowercase letters not uppercase; if you are required to use the shift key it will be indicated as “Shift”.


Chrome Page Navigation Shortcuts

These browser shortcuts are all scrolling functions that permit you to use the keyboard to navigate a Chrome web page quickly and efficiently. You will find that many of these navigation shortcuts are quite similar to other browsers.
  • Space Bar – Page down one full screen at a time
  • Page Down — Page down one full screen at a time
  • Down Arrow – Scroll Down
  • Shift  + Space Bar – Page up one full screen at a time
  • Page Up — Page up one full screen at a time
  • Up Arrow – Scroll Up
  • Home – Go to the top of the webpage
  • End – Go to the bottom of the webpage

Chrome Browser Window Shortcuts

These shortcuts open and close Google Chrome browser windows.
  • Ctrl + N – Open a new window
  • Ctrl + Shift + N – Open a new window in incognito mode (Pages viewed in incognito mode won’t show in browser history or search history. They also won’t leave cookies or other traces)
  • Alt + F4 – Close the current window
  • Shift + Click on link – Open the link in a new window

Chrome Tab Shortcuts

These browser shortcuts provide quick control of Chrome’s Tabs and allow you to quickly switch between open Tabs, open or close a Tab, and open or close links in new Tabs within the Chrome browser.
  • Ctrl + Click on link – Open link in a new tab in the background
  • Ctrl + Shift — Click on link – Open the link in a new tab and switch to the newly opened tab
  • Ctrl + T – Open a new tab
  • Ctrl + Shift + T – Reopen the last tab that was closed
  • Ctrl + 1 through Ctrl + 8 – Switch to the tab at the specified position
  • Ctrl + 9 – Switch to the last tab
  • Ctrl + Tab – Switch to the next tab
  • Ctrl + Shift + Tab or Ctrl + PgUp – Switch to the previous tab
  • Backspace – Go to the previous page in your browsing history for the tab
  • Shift + Backspace  – Go to the next page in your browsing history for the tab
  • Ctrl + W – Close the current tab or pop-up
  • Alt + Home – Go to your homepage in the current tab
  • Ctrl + Click the Back Arrow, Forward Arrow, or Go button – Open destination in a new tab in the background
  • Drag a link to a tab – Open the link in the tab
  • Drag a link to a blank area on the tab strip – Open the link in a new tab
  • Drag a tab out of the tab strip – Open the tab in a new window
  • Drag a tab out of the tab strip and into an existing window’s tab strip – Open the tab in the existing window
  • Press ESC while dragging a tab – Return the tab to its original position

Chrome Webpage Shortcuts

You are able to manage many common browser tasks with these Google Chrome shortcuts, including bookmarks, search functions, utilities, and more.
  • Ctrl + P – Print the current page
  • Ctrl + S – Save the current page
  • Ctrl + O – Open a file from your computer in Google Chrome
  • F5 – Reload the current page
  • Esc – Stop page loading
  • Ctrl + F5 – Reload the current page (ignore cached content)
  • Ctrl + D – Bookmark the current webpage
  • Ctrl + Shift + D – Save all open pages as bookmarks in a new folder
  • Alt + Click on link – Download link
  • Ctrl + F – Open the search box
  • F3 – Find the next match for your input in the search box
  • Shift + F3 – Find the previous match for your input in the search box
  • F11 – Open page in full screen mode
  • Ctrl + + – Make the text larger
  • Ctrl + -  – Make the text smaller
  • Ctrl + 0 – Return text to normal size
  • Ctrl + Shift + B – Toggle the bookmarks bar
  • Ctrl + H – View the History page
  • Ctrl + J – View the Downloads page
  • Shift + Esc – View the task manager
  • Ctrl + Shift + Delete – Open the Clear Browsing Data Dialog
  • F1 - Open the Help Center in a new tab
  • Ctrl + U – View page source code

Chrome Address Bar Shortcuts

All of these Chrome keyboard shortcuts affect the contents in the Chrome browser address bar and can improve searching functionality within Chrome.
  • Type a search term, then press Enter – Perform a search using your default search engine
  • Type a search engine URL, then press TAB, type a search term, and press Enter – Perform a search using search engine associated with the URL
  • Ctrl + Enter after typing base web address – Automatically add ‘www.’ and ‘.com’ what you have typed in the address bar and open that web address.
  • F6 – Highlight address bar contents
  • Type a web address then Alt + Enter – Open web address that appears in the address bar in a new tab
  • Ctrl + K – Initiate a Google search with the address bar. After typing the shortcut key, a ‘?’ will appear in the address bar. Type your query then press Enter.
  • Ctrl + Right Arrow – Jump to the next word in the address bar
  • Ctrl + Backspace – Delete the previous word in the address bar
  • Select an entry from the drop down menu in the address bar, then press Shift — Delete – Delete the entry from the browsing history
  • Click an entry in the address bar drop down list with the Middle Mouse Button – Open that URL in a new tab

Chrome Mouse Shortcuts

Google Chrome also allows a few shortcuts to be executed with the mouse buttons and scroll wheel.
  • Middle click on link – Open the link in a new tab in the background
  • Shift + Middle click on link – Open the link in a new tab and switch to the newly opened tab
  • Middle click on tab – Close the tab
  • Click the Back Button, Forward Arrow, or Go button with Middle Mouse Button -  Open destination in a new tab in the background
  • Shift + Scroll Wheel – Scroll horizontally
  • Ctrl + Scroll Wheel – Increase or decrease text size
Quite a list of potential productivity boosting keystroke shortcuts! Some Google Chrome shortcuts are rather basic and others may take a bit of time to get used to, but once you learn to master even a handful of them you will see an increase in your efficiency and speed when navigating and browsing the Internet. The best learning method is often to start small with the functions you use most frequently within Chrome and expand on the list as you learn. Here a useful video for more insights.

Gmail Backup – Backing Up Gmail Data to Your Computer


gmail-keyboard-shortcuts Gmail keyboard shortcuts are a great way to increase your computing performance. These small combinations of keystrokes within Gmail can be a real productivity booster and help you avoid having to move your hand from keyboard to mouse as frequently. Our previous posts on keyboard shortcuts have included Firefox shortcuts, Internet Explorer shortcuts, Google Chrome Shortcuts and Windows shortcuts. Here are 45 timesaving Gmail keyboard shortcuts to help increase your efficiency when using the Google mail environment.

Gmail Keyboard Shortcuts – Some Differences

Gmail shortcuts are somewhat different than browser keyboard shortcuts for two main reasons:
  1. Limits on Keystroke Choices: when using Gmail keyboard shortcuts you are working within a web browser so Gmail cannot duplicate any of the standard shortcut key combinations used by Firefox, Internet Explorer, Chrome, Safari or Opera web browsers;
  2. Functions Vary by Location: Gmail shortcut functionality is based on your location within Gmail. Some shortcuts function only when reading a message or conversation, some work only when viewing conversation lists such as Inbox or All Mail, or viewing Contacts or Tasks.
Activating Gmail’s Keyboard Shortcuts
Before these shortcuts can be used you have to make sure that the Keyboard Shortcuts Setting for Gmail is set to “on” in Gmail Settings as shown here:
Gmail-Keyboard-shortcuts
To help clarify how Gmail keyboard shortcuts are used they have been grouped below by functionality, such as Navigation, Selection, Management or General.

Gmail Top Level View Navigation Shortcuts

These combinations of keystrokes speed up navigating among top level views such as Inbox, Sent Mail, All Mail, Spam, Trash, Drafts, Contacts and Tasks.  All letters in the keystroke combinations are shown in lower case but are not case sensitive. An example: “g then i” means press the “g” key then the “i” key, one right after the other.
  • g then i –  Open the Inbox.
  • g then s –  Open Starred.
  • g then t –  Open Sent Mail.
  • g then d –   Open Drafts.
  • g then a –  Open All Mail.
  • g then c –  Open Contacts.
  • g then k –  Open Tasks.

Gmail Selection and Management Shortcuts

These combinations of keystrokes are used within a specific view such as Inbox or All Mail to assist with quickly managing messages and conversations.
  • * then a –    Select all conversations.
  • * then n –    Deselect all conversations.
  • * then r –    Select only read conversations.
  • * then u –    Select only unread conversations.
  • * then s –    Select only starred conversations.
  • * then t –    Select only unstarred conversations.
  • x — Select a specific conversation; puts a check in checkbox; works as a toggle.
  • s – Stars a specific conversation; works as a toggle.
  • . – Open the More Actions dropdown list; works as a toggle.
  • e — Archive a conversation from current View into the All Mail View.
  • l – Open the Labels dropdown list to allow you to apply a label to a conversation.
  • # — Move the selected conversation to the Trash.
  • <Shift> + i — Mark selected conversations as read.
  • <Shift> + u – Mark selected conversations as unread.

Gmail Message Navigation Shortcuts

These Gmail keyboard shortcuts are used for navigating within conversations lists or views. The small black arrow at the left of the conversation list indicates the current conversation focus.
  • u – Return to conversation list (View) from current conversation.
  • k – Move to newer conversation; location indicated by black arrow on left.
  • j – Move to older conversation; location indicated by black arrow on left.
  • <Enter> or o –    Open selected conversation; black arrow indicates selection.
  • <Shift> + <Enter> or <Shift> + o — Open a conversation in a new window; black arrow indicates selection.
  • p — Read previous message within a conversation.
  • n — Read next message within a conversation.
  • r – Reply to sender when a conversation is open.
  • <Shift> + r — Open the reply in a new window.
  • a — Reply to all when a conversation is open.
  • <Shift> + a — Open the reply to all in a new window.
  • f — Forward current conversation when a conversation is open.
  • <Shift> + f — Open the forward current conversation in a new window.
  • <Ctrl> + s — Save a new or edited conversation as a draft. Cursor must be in a text field.
  • [ -- Archive the current conversation and move to the previous one.
  • ] – Archive the current conversation and move to the next one.

Gmail General Top Level Shortcuts

  • c – Open a new message.
  • <Shift> + c – Open a new message in a new window.
  • / — Move cursor to the entry box for Search Mail.
  • z – Undo previous action. Mainly used when typing and works as an “undelete”.
  • Esc – Remove the cursor from a search box or any input field.
Standard Windows shortcuts such as <Ctrl> + c, <Ctrl> + x and <Ctrl> + v are also useable within Gmail when editing text. Most browser shortcuts such as <spacebar> and Shift + <spacebar> for scrolling up or down a page are also usable.
Some other locations for more information on Gmail keyboard shortcuts include the Gmail Help Center and the Official Gmail Blog.

Apple iPhone 4S-Review


CDMA available only if sold and activated for use on a CDMA network.


General2G NetworkGSM 850 / 900 / 1800 / 1900

CDMA 800 / 1900
3G NetworkHSDPA 850 / 900 / 1900 / 2100

CDMA2000 1xEV-DO
Announced2011, October
StatusAvailable. Released 2011, October

BodyDimensions115.2 x 58.6 x 9.3 mm
Weight140 g

DisplayTypeLED-backlit IPS TFT, capacitive touchscreen, 16M colors
Size640 x 960 pixels, 3.5 inches (~330 ppi pixel density)
MultitouchYes
ProtectionScratch-resistant glass, oleophobic coating

SoundAlert typesVibration, MP3 ringtones
Loudspeaker Yes
3.5mm jack Yes

MemoryCard slotNo
Internal16/32/64 GB storage, 512 MB RAM

DataGPRSYes
EDGEYes
SpeedHSDPA, 14.4 Mbps; HSUPA, 5.8 Mbps
WLANWi-Fi 802.11 b/g/n, Wi-Fi hotspot
BluetoothYes, v4.0 with A2DP
USBYes, v2.0

CameraPrimary8 MP, 3264x2448 pixels, autofocus, LED flash, check quality
FeaturesTouch focus, geo-tagging, face detection, HDR
VideoYes, 1080p@30fps, LED video light, video stabilization, geo-tagging, check quality
SecondaryYes, VGA, 480p@30fps, videocalling over Wi-Fi only

FeaturesOSiOS 5
ChipsetApple A5
CPUDual-core 1 GHz Cortex-A9
GPUPowerVR SGX543MP2
SensorsAccelerometer, gyro, proximity, compass
MessagingiMessage, SMS (threaded view), MMS, Email, Push Email
BrowserHTML (Safari)
RadioNo
GPSYes, with A-GPS support and GLONASS
JavaNo
ColorsBlack, White

- MicroSIM card support only

- Scratch-resistant glass back panel

- Active noise cancellation with dedicated mic

- Siri natural language commands and dictation

- iCloud cloud service

- Twitter integration

- Google Maps

- Audio/video player and editor

- Image editor

- Voice command/dial

- TV-out

Battery
Standard battery, Li-Po 1432 mAh
Stand-byUp to 200 h (2G) / Up to 200 h (3G)
Talk timeUp to 14 h (2G) / Up to 8 h (3G)
Music playUp to 40 h

MiscSAR US
1.18 W/kg (head) 0.98 W/kg (body)
SAR EU
0.99 W/kg (head) 0.99 W/kg (body)
Price group

Ebook- Head first Java 2nd Edition


Ebook- Head first Java 2nd Edition(Download)

Nokia Lumia 800 - Gadget Review


Also known as Nokia Sea Ray

General 2G Network GSM 850 / 900 / 1800 / 1900
3G Network HSDPA 850 / 900 / 1900 / 2100 - RM-819
HSDPA 850 / 1900 / 2100 - For Canada
HSDPA 900 / 1900 / 2100 - RM-801 CV
Announced 2011, October
Status Available. Released 2011, November
Body Dimensions 116.5 x 61.2 x 12.1 mm, 76.1 cc
Weight 142 g
- Touch-sensitive controls
Display Type AMOLED capacitive touchscreen, 16M colors
Size 480 x 800 pixels, 3.7 inches (~252 ppi pixel density)
Multitouch Yes
Protection Corning Gorilla Glass
- Nokia ClearBlack display
Sound Alert types Vibration; MP3, WAV ringtones
Loudspeaker Yes
3.5mm jack Yes
Memory Card slot No
Internal 16 GB storage, 512 MB RAM
Data GPRS Class 33
EDGE Class 33
Speed HSDPA 14.4 Mbps, HSUPA 5.76 Mbps
WLAN Wi-Fi 802.11 b/g/n
Bluetooth Yes, v2.1 with A2DP, EDR
USB Yes, microUSB v2.0
Camera Primary 8 MP, 3264x2448 pixels, Carl Zeiss optics, autofocus, dual-LED flash, check quality
Features Geo-tagging
Video Yes, 720p@30fps, check quality
Secondary No
Features OS Microsoft Windows Phone 7.5 Mango
Chipset Qualcomm MSM8255 Snapdragon
CPU 1.4 GHz Scorpion
GPU Adreno 205
Sensors Accelerometer, proximity, compass
Messaging SMS (threaded view), MMS, Email, Push Email, IM
Browser WAP 2.0/xHTML, HTML5, RSS feeds
Radio Stereo FM radio with RDS
GPS Yes, with A-GPS support
Java No
Colors Black, Cyan, Magenta
- MicroSIM card support only
- SNS integration
- Active noise cancellation with dedicated mic
- MP3/WAV/eAAC+/WMA player
- MP4/H.264/H.263/WMV player
- Document viewer/editor
- Video/photo editor
- Voice memo/command/dial
- Predictive text input
Battery Standard battery, Li-Ion 1450 mAh (BV-5JW)
Stand-by Up to 265 h (2G) / Up to 335 h (3G)
Talk time Up to 13 h (2G) / Up to 9 h 30 min (3G)
Music play Up to 55 h

Ebook- OReilly Head First Object Oriented Analysis and Design


OReilly.Head.First.Object.Oriented.Analysis.and.Design.

Ebook-Head First SQL Your Brain on SQL- A Learner Guide (Download)

Ebook-Head First SQL Your Brain on SQL- A Learner Guide (Download)

Thursday, January 12, 2012

Tips to Improve your android battery life

Tips to improve battery life

  • Turn off unnecessary Wireless : The number of wireless operating devices that are turned on affects your battery life. This includes

    • WiFi
    • BlueTooth
    • GPS (Global Position System)
    • NFC (Near Field Communications)
    • 3G/Data connection
    • 2G voice communication.

    So the more devices that are turned on the more battery is consumed. Typically you would not need to use BlueTooth and GPS so you can turn it off when not used. Typically the wireless settings are under Settings > Wireless and Networks, as shown below:

    Android turn off Wireless

    Similarly with GPS which is under Settings > Location. GPS takes up a lot of battery when used. If you are not using 3G, you can disable 3G altogether by enabling the "Use only 2G Networks" setting in Mobile networks settings. A good application that ships by default in android is the power control application widget which can be put on the home screen to put shortcuts of these settings on your home screen. A slightly advanced version you can use is available as Widgetsoid in which you can configure your shortcuts. Here is my widgetsoid widget on my home screen that has shortcuts to most of the battery saving techniques discussed here:

    Android widgetsoid widget
  • Applications and Services :

    • The more applications you run, the more your CPU is used. Typically playing games result in draining of the battery. So if you want to save a battery life for that important call, you better not play that game. You can use a task killer to see and kill the applications. Applications such as "Task Killer", "Advanced Task Killer" etc can help you with this.

    • The similar is with services. There are many services that run on your android phone that does many tasks. You can stop some of the non essential services to save your battery life. You can stop running services by going into Applications > Running Services > Tap on the Service > Tap Stop

      see running services in android

    • You can also turn off background data and account sync to save battery life.

  • Wallpaper and Display :

    • Display brightness can determine the usage of your battery, the more the brightness the more the battery usage. So to extend the life we should use as minimum as possible. But since usability is a big concern, putting the display in automatic brightness is the best as it automatically increases and reduces screen brightness according to ambient light. You can find the settings > Display > Brightness.
    • While you are at it you can also reduce the Screen timeout to a lower value so that your screen is turned off when not in use which can save you lots of juice.

    • Putting a live wallpaper can also eat more of your battery life so if you want to improve battery life consider using a static wallpaper. It would also help to choose a dark wallpaper with lots of black as it requires less energy to display a black dot than a white dot. So using a dark wallpaper definitely helps. See my wallpaper at nexus s wallpaper for a dark wallpaper.

  • Tones and sounds :

    • You can reduce the volume or turn off unnecessary sounds like Screen lock sounds.
    • You can also turn off Haptic Feedback to save battery.

On the move battery drains faster

This one is applicable to any mobile phone not just android, when you are on the move the cell networks and antennas keep changing this causes significant radio traffic and hence drains more battery. Moreover more battery is used to communicate to weak signals from various towers. You can turn off all the wireless if you are absolutely positively sure of not expecting any calls (This is true when doing overnight journeys and half the journey you may not have a signal) by turning on the Airplane mode. But you wont get any calls or messages making your phone useless, but battery is saved so that you can use it when you arrive at your destination.

More tips on how to extend your battery life are on its way ..

Have a tip that worked for you ? Share with others and let us know. Post a comment.

Still your battery life is low ? Carry a USB data cable at all times.